















Equipment List
Denali Prep Equipment List
Below is a complete list of all the equipment required for this course. Most items are clickable and will take you directly to our Equipment Shop Page, where you can view equipment that meets the course requirements. You may purchase items in advance, buy them on the day of the course, or rent them if rentals are available.
Read everything here carefully.
This list represents a “worst-case scenario” for trips with significant weather. Some items may not be needed if conditions are mild, but it’s best to plan for the worst. This is the list for Denali Prep only, and should not be referenced for the actual Denali climb.
On day one of your course, an AAI Guide and an Equipment Specialist will help refine your kit, ensuring you have exactly what’s needed. Bringing extra gear or items you have questions about is fine. Unused items can be left at our Equipment Shop.
Check the forecast before your course to ensure proper preparation: NOAA Mt. Baker-Snoqualmie National Forest Weekly Forecast.
Provided Equipment
Climbing rope, anchors, and solid waste bags.
Rentals
Equipment available for rent through the AAI Equipment Shop is designated as “available for rent”. These items can be rented on the first day of your course.
Click each underlined heading to see examples and make online purchases of guide-approved gear from the Equipment Shop.
Clothing
-HEADWEAR-
- Beanie/Toque
- Wool or synthetic. Must fit under a helmet. Easily replaced with hooded layers after the early season.
- Sun Hat
- Ideally fits under a helmet. Ball caps with a button on top are NOT recommended. Visors or athletic hats are more comfortable, vent better, and are easier to clean and dry out.
- Buff / Neck Gaiter
- UPF-rated is highly recommended. Lighter colors are better for warm conditions and darker for colder conditions.
- Glacier Glasses
- Look for lenses that are CAT4 rated and have side shields. Ordinary sunglasses are NOT ADEQUATE!! Photochromic are more expensive, but usable in a wider range of light.
- NOTE: Those using contacts should also bring a pair of prescription glasses in the event that your contacts or solution are lost or damaged. If you only use glasses, get a pair of over-the-glasses glacier glasses.
- Look for lenses that are CAT4 rated and have side shields. Ordinary sunglasses are NOT ADEQUATE!! Photochromic are more expensive, but usable in a wider range of light.
- Headlamp
- Bring extra batteries or charger for rechargeable battery style. Ideal range is 350 or more lumens.
- Goggles
- This is a very important pice of gear to protect you from high winds or heavy precipitation. They should be 100% UV rated lenses. Bring either a photochromic lens (a lens that gets lighter or darker depending on conditions) , or a double lens set up with one darker lens and one lighter lens that you can change out depending on conditions.
- If you do bring two lenses, please be proficient at changing them out with gloves on before heading onto the mountain.
- If you use prescription glasses, make sure and purchase an OTG (Over-The-Glass) version of the goggles so they fit over your prescription glasses. Or you can visit www.sportrx.com and safetygearpro.com to get prescription lenses for your goggles.
- This is a very important pice of gear to protect you from high winds or heavy precipitation. They should be 100% UV rated lenses. Bring either a photochromic lens (a lens that gets lighter or darker depending on conditions) , or a double lens set up with one darker lens and one lighter lens that you can change out depending on conditions.
- Nose Protection
- Designed to protect your nose from intense sunlight, this is a UPF-rated cloth nose guard that fits onto your glacier glasses. Try the fit on your glasses; they should fit well without pushing the frames off your nose. Trim as needed.
- Half Face Maks/Balaclava
- This category of item is a vital part for protecting skin on the head during cold and windy conditions. Guides will usually want to be sent a picture of you wearing your full headgear (bavaclava/half face mask, goggles, beanie/hoods) to ensure no skin is visible.
–GLOVES–
- Liner Gloves
- Thin, lightweight, wool or synthetic gloves. Size to fit snug but not too tight. Phone-compatible fingertips and palm texture are nice to have. These could be worn alone in temps greater than 25°F when it is dry. UPF rated are ideal.
- Midweight Softshell Gloves
- Bring 1 pair, 2 during the early season. These gloves are used for belaying, tying knots, rope management etc. Dexterity and durability are key. They provide slightly more insulation than a liner glove and are generally used in temps of 15°F to 30°F while actively using your hands. Comfortable but snug fit. Durable leather or synthetic palm. Water-resistant is recommended because they will dry faster.
- Insulated Waterproof Glove (Optional)
- This glove is optional to bring but can be very useful in certain situations. A generic ski glove will work for this category. This is a nice middle ground in functionality between the mid-weight soft-shell gloves and the expedition weight gloves. They can also work as a dry pair of gloves to be able to switch into if another pair gets wet.
- This glove is optional to bring but can be very useful in certain situations. A generic ski glove will work for this category. This is a nice middle ground in functionality between the mid-weight soft-shell gloves and the expedition weight gloves. They can also work as a dry pair of gloves to be able to switch into if another pair gets wet.
- Hardshell Gloves
- Waterproof and insulated. If the glove lacks insulation, size it to fit a liner glove inside. Mainly used in wet conditions, cold temps, or when not moving.
- Expedition Weight Fingered Gloves
- Composed of heavy-duty waterproof shells with a mid-weight liner, these modular gloves MUST have removable liners or be sized to fit a liner glove inside. Should be dexterous enough to handle ropes, carabiners, and ascenders. Gauntlets should extend to mid-forearm. Very important to size these kind of loosely, we don’t want any compression of the hand as to restrict blood-flow and compress the insulation to make it less effective.
- Mittens
- Bring 1 pair of mid-weight mittens, these do not have to be expedition weight. If you have expedition weight mitts then those will work as well. These will be worn while not active, or in very cold conditions. Synthetic insulation and a waterproof membrane are recommended for the Cascades.
- If you plan on climbing Denali in the future, or want to do winter camping or expeditions in the future, then investing in an expedition weight mitt makes sense. Also, if you tend to have cold hands.
- Bring 1 pair of mid-weight mittens, these do not have to be expedition weight. If you have expedition weight mitts then those will work as well. These will be worn while not active, or in very cold conditions. Synthetic insulation and a waterproof membrane are recommended for the Cascades.
-BASELAYERS-
- Undergarments
- Wool or synthetic. Long, compression-style undergarments can help reduce inner thigh chafing. Sports bras without shoulder buckles or clasps are more comfortable under a pack.
- Base Top
- A lightweight, wool or synthetic sun hoody is ideal. UPF 30+ sun protection is best. UPF clothing works better than sunscreen. Bring 1 or 2. Bring a slightly insulated one if you get cold easily or one of both.
- Base Layer Pants
- Wool or synthetic. Typically thin. Bring 1 for the early or late season. Optional for mid-season (depending on weather).
- Expedition Weight Base Layer Pant
- A thicker pair of long underwear bottoms that will serve as an additional insulating layer for use in colder temperatures. Windproof/Windstopper pants are heavier and less functional and will not work for this layer.
-MIDLAYERS-
- Active Insulation Top
- Lightweight “gridded fleece” or lightweight synthetic insulated jacket or pullover. Hood preferred. Active insulation weight – 40g/m2. Heavier insulation weight – 60-80g/m2. Alpha fleece works as well.
- Softshell Pants
- Thin, weather-resistant, breathable, and stretchy. You will wear these a majority of the time.
- Softshell Jacket
- A soft shell jacket is considered an “action layer.” Its materials are designed to stretch and breathe while also maintaining wind and water resistance. This allows the user to leave this jacket on for a wide range of temps and conditions throughout the day without the hassle of constantly changing layers. Windproof jackets are lightweight and packable but lack the breathability and stretchy nature of the soft shell. Windproof jackets are ideal for blocking wind and light precipitation during low-output activities.
-INSULATING LAYERS-
- Insulation Jacket
- AKA the “puffy”. Down or synthetic. This piece is worn in cold conditions or when not moving. Hood preferred. If choosing down, water-resistant down treatment is preferred to help prevent matting and loss of insulating ability if the jacket gets wet. If your goal is a bigger peak like Denali, then an expedition weight parka is what you want.
- Passive Insulation Jacket
- The goal for this piece is to add warmth to an internal layering system. Depending on clothing system/environmental conditions, may be worn underneath or over top of your shell jacket. The weight and design of this piece will vary based on the other items of clothing that you are bringing. Generally, jackets with 60g – 100g of synthetic sheet insulation are adequate. For down, look for a fill weight of 100g-150g of 700 or higher fill power. If your general layers seem on the lighter side, or you run cold, then go for a heavier weight for this piece.
- Insulated Pants
- Full-length side-zips are a critical feature. Down or synthetic fill. Reinforced seat and knees recommended. For synthetic fill, look for 80g to 100g weight of insulation. For down fill, anywhere from 100g and up is fine for amount of down in the pants. If you run cold then stay on the warmer side of the spectrum. 8000M rated insulated pants are okay to bring if you are doing the Seven Summits.
- Full-length side-zips are a critical feature. Down or synthetic fill. Reinforced seat and knees recommended. For synthetic fill, look for 80g to 100g weight of insulation. For down fill, anywhere from 100g and up is fine for amount of down in the pants. If you run cold then stay on the warmer side of the spectrum. 8000M rated insulated pants are okay to bring if you are doing the Seven Summits.
-HARDSHELLS-
- Hardshell Jacket (Available to rent)
- Non-insulated jacket with a waterproof and breathable membrane. Three-layer construction is recommended. It must have a hood, ideally helmet-compatible. When sizing, make sure it can fit over other layers. Not insulated.
- Hard Shell Pants (Available to rent)
- Non-insulated, waterproof, and breathable membrane. Full side zips are recommended. Ideally has at least 1/4 length zipper from the bottom of the pant cuff in order to get pants on and off while wearing mountain boots. When sizing make sure it is able to fit over a base layer and soft shell pants. Insulated ski pants are strongly discouraged due to lack of waterproofness and heavy insulation.
-FOOTWEAR-
- Socks
- Bring two over-the-calf complete changes, more if you know you tend to have sweaty feet. Mid-weight socks work great here. We want to let the insulation of the boot do the work for you. A lighter weight sock will allow for a more accurate boot fit, and ample room for your feet to swell. This is important because we do not want to inhibit blood flow to the feet, the most important factor when trying to keep your feet warm. Adjust your sock system ahead of time to perfect your boot fit.
- Bring two over-the-calf complete changes, more if you know you tend to have sweaty feet. Mid-weight socks work great here. We want to let the insulation of the boot do the work for you. A lighter weight sock will allow for a more accurate boot fit, and ample room for your feet to swell. This is important because we do not want to inhibit blood flow to the feet, the most important factor when trying to keep your feet warm. Adjust your sock system ahead of time to perfect your boot fit.
- Mountaineering Boots (Available to rent)
- This is one of the most important items on this list, proper fit, and function with sock system is a MUST. Double boots are required, designed for extended use in cold temperatures.
- Gaiters (Available to rent)
- Knee or calf height. Best used in early season conditions. Optional for mid and late season. Gaiters do help protect pants from crampon holes regardless of the season.
- Camp Booties
- Comfort and morale again are an important aspect for a successful expedition. Getting out of your boots at the end of the day and slipping them into one of these is a morale booster for sure! Down or synthetic fill.
- Comfort and morale again are an important aspect for a successful expedition. Getting out of your boots at the end of the day and slipping them into one of these is a morale booster for sure! Down or synthetic fill.
CLIMBING
- Crampons (Available to Rent)
- Modern, steel, 12-point, strap-on or semi-automatic crampons are required if you are bringing overboots. Fully automatic or step-in crampons are okay if you are NOT bringing an overboot. Fully automatic crampons do not fit with overboots on since the overboot covers the toe bail. Regardless, be sure crampon, overboot, and boot combination work well together. Make sure that you get a longer linking bar if your boots are too big for the standard one. Aluminum crampons are not functional on Denali.
- Belay Device
- Bring an auto-blocking device that accepts 2 ropes.
- Helmet (Available to rent)
- Must be UIAA-rated for climbing. Be aware that foam, break-away style helmets like the ones listed are susceptible to damage if being loaded in a checked bag.
- Mountaineering Harness (Available to rent)
- Must be UIAA or CE rated for climbing. This harness should be light and packable. Size it to be able to fit over several layers. Having releasable leg loops is a desired feature so you can put on and take off the harness with boots and crampons still on.
- Ice Axe (Available to rent)
- A straight or slightly curved shaft ice axe is recommended. An adze is required. Please contact the Equipment Shop if you have any questions. Ice axe leashes are discouraged and not recommended.
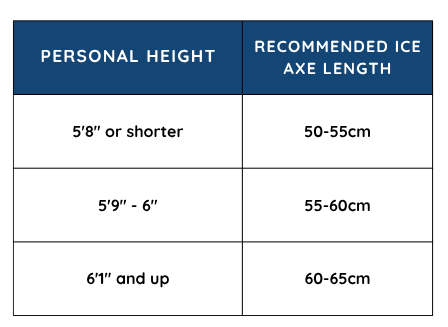
- NOTE: For participants looking to continue on to higher-level courses such as AMTL 2 or Alpine Ice, a slightly curved ice axe in the 50-55cm range, such as the Petzl Sum’Tec is appropriate.
- Slings
- One (60cm) pre-sewn sling. Slings must be UIAA-rated for climbing.
- Carabiners
- Must be UIAA-rated for climbing. Must have:
- 6 large pear-shaped munter-style locking carabiners
- 4 non-locking wire gate carabiners
- MUST be easy to manipulate with large gloves on, lightweight is preferred. Auto locking, triple action, and magnetic lockers are not allowed. They will freeze up and malfunction. Carabiners are considered group gear and will wind up changing hands while on the expedition. Label/tape them well if you want your exact carabiners back at the end of the trip.
- Must be UIAA-rated for climbing. Must have:
- Trekking Poles (Available to rent)
- Two are required. Need to be collapsable and three section poles are ideal. Leverlock closures are highly recommended. Twist lock closures either break or wear out easily and then there is no good way of fixing them. Even if you don’t normally use trekking poles, on this expedition in particular, they are invaluable in helping with balance while carrying heavy packs on snowshoes. Poles on the burlier side will be more durable and be more stable with a heavy load.
- Accessory Cord
- You will need 2 lengths of 6mm nylon cord: 12ft and 6ft. Avoid stiff cord or any cord older than 5 years. If you have a longer section of cord than what is requested, then we can cut these down to proper length when you arrive in Bellingham. We also have accessory cord here, and this can be picked up the morning of your course.
- Snowshoes
- Equipped with an integral crampon and/or aggressive traction on the bottom of the snowshoes. Snowshoes can be sized smaller than is typically recommended by manufacturers since deep snow is not common on the climbing route. Large profile basic models made by Tubbs, Atlas, and Sherpa do not work well and are not recommended. Models by MSR are proven and quite durable. Many climbers rent these from AAI as they are hard to travel with. Length should not exceed 25-28 inches.
- Avalanche Probe (Available to Rent)
- A 230cm length is the minimum. If you are in the Cascades with an especially deep snowpack then a 320cm probe is recommended. Carbon fiber is lighter and suffers less deflection than aluminum models. Look for a model that has graduated depth markings for use during snow pit studies.
- Avalanche Transceiver (Available for Rent)
- Your transceiver MUST be a modern, 3-antenna, single frequency (457kHz) transceiver. If your beacon is older than 5 years, you should consider retiring it or returning it to the manufacturer to have it tested for function and frequency drift. Older 2-antenna transceivers are obsolete.
- Avalanche Shovel (Available to Rent)
- We require metal (aluminum) shovels. Newer models are lighter, stronger, more packable, and more ergonomic than older ones. Avalanche shovels now have a UIAA rating, so keep that in mind when shopping. Additionally, we recommend a mid-sized blade that can fit in your pack. Smaller blades don’t move enough snow, and larger blades move too much snow where efficiency is lost. A shovel that has a hoe-mode and snow profile-friendly blades are also a bonus.
- We require metal (aluminum) shovels. Newer models are lighter, stronger, more packable, and more ergonomic than older ones. Avalanche shovels now have a UIAA rating, so keep that in mind when shopping. Additionally, we recommend a mid-sized blade that can fit in your pack. Smaller blades don’t move enough snow, and larger blades move too much snow where efficiency is lost. A shovel that has a hoe-mode and snow profile-friendly blades are also a bonus.
- Day Pack (Optional)
- A 25L to 35L is an ideal size. This will be used during rock climbing and can also be used as a summit pack. Ideally, this pack is frameless so that it can be packed inside your larger pack if you decide to bring it on the mountain.
- Internal Frame Pack (Available to rent)
- Large internal frame pack should fit your body type. At least 70L capacity is required. We recommend avoiding bells and whistles like large, full-length zippers, separate sleeping bag compartments, etc. It is very important that your pack be in good working order and not prone to failures of any sort.
- Large Duffle Bag
- Your large duffel (120L-140L) should have a full-length zipper and be of durable construction for use on the mountain to transport gear in your sled. Longer, lower-height duffels are recommended as opposed to shorter, taller ones because they hold a lower center of gravity in the sled.
- Small Duffle Bag
- A second duffel (40-60L) or travel bag will be needed to store your town clothes and personal items while on the mountain. This bag can be left at the shop. This can also be a pack or luggage, as long as you have something to consolidate extra equipment you will be storing at the shop.
- A second duffel (40-60L) or travel bag will be needed to store your town clothes and personal items while on the mountain. This bag can be left at the shop. This can also be a pack or luggage, as long as you have something to consolidate extra equipment you will be storing at the shop.
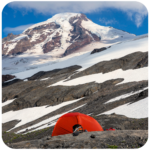
Camping
- Tent (Available to rent)
- 3 season tents can be used if the rain fly goes all the way to the ground on all sides. A “bathtub” floor for the inner test is also recommended. This means that the inner tent has a water-resistant floor material that scoops up from the floor 4-12″ before changing to mesh. If your tent does not have wind lines, an additional 6-10ft of 3mm accessory cord is needed for rigging your rainfly in a mountain environment. (You can rent a 4-season and it’s possible to share if you would like).
- Early Season: Double wall 4-season tent recommended.
- Mid Season: 4-season or 3-season tent.
- Late Season: 4-season tent recommended.
- 3 season tents can be used if the rain fly goes all the way to the ground on all sides. A “bathtub” floor for the inner test is also recommended. This means that the inner tent has a water-resistant floor material that scoops up from the floor 4-12″ before changing to mesh. If your tent does not have wind lines, an additional 6-10ft of 3mm accessory cord is needed for rigging your rainfly in a mountain environment. (You can rent a 4-season and it’s possible to share if you would like).
- Sleeping Bag (Available to rent)
- Synthetic or down . 0F is the recommended temperature rating for this course. Make sure and get a bag that fits your length correctly, as having too much or too little space in the bag is inefficient for keeping you warm.
- Compression Stuff Sack
- For your sleeping bag. A waterproof compression sack is recommended.
- Sleeping Pad (Available to rent)
- One inflatable and 1 closed-cell foam. The foam pad helps insulate from the snow and serves as a backup to the inflatable pad. A winter-rated inflatable pad is recommended with an R value of at least 5 being ideal. Pads with an R value of at least 4 are acceptable. Since
-Camp Kitchen-
Link to all camp kitchen items below.
- Utensils
- Bigger is better. Long handle preferred. Plastic and high temp nylons are not recommended as they break easily in cold temps.
- Insulated Eating Container
- A lightweight tupperware container with insulation is recommended. Avoid small bowls that are prone to tipping and more fragile (plastic). Metal containers conduct heat more rapidly and lead to colder food and drinks faster than other materials.
- NOTE: Wrapping your eating container in closed-cell foam (sleeping pad material) is a Guide’s tip for keeping your food warmer longer.
- A lightweight tupperware container with insulation is recommended. Avoid small bowls that are prone to tipping and more fragile (plastic). Metal containers conduct heat more rapidly and lead to colder food and drinks faster than other materials.
- Personal Thermal Mug
- A 12-32oz insulated mug with a lid.
- Water Bottles
- Two or three water bottles, one-liter wide mouth Nalgene type, are required. 2.5-3 liters of water capacity minimum. Narrow mouth bottles are not functional and should not be used. Hydration bladders are not allowed, they are not functional for a Denali expedition.
- Water Bottle Parkas
- These insulating jackets are for your water bottles to help prevent freezing. Bring one for each bottle.
- NOTE: Please write your initials on the outside of the parka, making it easy for your guides to fill up and return them to you.
- These insulating jackets are for your water bottles to help prevent freezing. Bring one for each bottle.
>Click here for full camp kitchen items for sale
Other Essentials
- Toothbrush & Toothpaste
- Travel size recommended
- Hand Sanitizer
- Required. Used after going to the bathroom and before eating.
- Face and Body Wipes
- The mountain shower. For personal hygiene and general use. Allot for at least 1-2 a day while on the mountain. Using makeup remover pads have been found helpful for taking off sunscreen.
- Pee Bottle
- Used at night or when the weather is poor so you don’t have to get out of your tent. 1-quart size minimum. A collapsible 2L Nalgene recommended. Plastic bottles from the store such as Gatorade bottles can work well but the lids are less secure than a Nalgene. If you choose to bring one of these, use it carefully and make sure the capacity is adequate. Label your pee bottle well.
- Foot Powder/Antiperspirant
- A very small bottle will allow you to treat your feet daily, keep them drier, extend the life of your socks, and help you avoid blisters/rashes from chronic wet feet.
- Alarm Clock
- You will be responsible for waking up at certain times throughout the program. While your guide can sometimes be your alarm, there are often situations where tents are far apart. Be sure if you use your phone as an alarm that you have enough backup battery to accommodate for this. If you plan to use a watch, be sure your alarm is loud enough to work for you.
- Toilet Paper
- The provided solid waste bags have a small amount of toilet paper with them, but most people do not find this to be adequate. Estimate how much you’ll need for a program of this length and place that in a plastic zip-lock bag. An extra zip lock bag can be helpful for pack-out of used paper. If you plan to use wet wipes, be wary of scented or exfoliating types as these can be an irritant for some people.
- Pee Cloth (Optional)
- A reusable, antimicrobial pee cloth, used in place of toilet paper or wet wipes. Note that everything is pack-it-in/pack-it-out for Leave No Trace purposes. If toilet paper is used, it will have to be packed out. This also helps keep pack weight down.
- Urination Device (Optional)
- Pee funnels such as the GoGirl or Freshette.
- Menstrual Cup (Optional)
- As with toilet paper, everything in the backcountry must be packed out. Menstrual cups can help with waste needing to be packed out.
- Suncreen
- At least an SPF of 30+, zinc-based is preferred. Small travel-size tubes are recommended so you can put them in a close-by pocket for easy access. Stick applicators allow you to apply without exposing fingers. Only your face and, at times, your hands will be exposed. Several small containers are better than one large one. Sunscreen is prone to freezing in the cold and smaller containers fit well into pockets for warming.
- Lip Balm
- Make sure it is SPF-rated. Bring 2.
- Personal First Aid Kit
- Cuts, Bruises, and Blister Kit
- 10 assorted Band-Aids
- Plenty of Compeed, Bandaid, or Dr. Scholls blister pads
- A packet of moleskin (note: some people are allergic to the glue on moleskin and other medical adhesives.)
- Personal Medications
- Tylenol, Ibuprofen, or Aspirin
- Immodium (Anti-Diarrhea)
- Antacids
- Pepto-Bismol (Stomach Relief)
- If you suffer from Asthma or significant allergic reactions, please notify AAI and your guide regarding the location and presence of your epi-pen and/or inhaler.
- The following drugs require a physician’s prescription. Be sure to discuss the use and precautions for each drug with your doctor.
- Acetazolamide (Diamox) – For prevention or treatment of Acute Mountain Sickness.
- Choose one broad-spectrum antibiotic that is known to be effective for lung microbes/respiratory tract infections.
- Trimethoprim-Sulfamethoxazole (Bactrim or Septra)
- Levaquin (levofloxacin)
- Gatifloxacin
- Ibuprofen, etc
- If you wear contacts, make sure you have spares if you can’t see without them
- NOTE: Always consult a doctor when selecting medications and antibiotics for personal use.
- Cuts, Bruises, and Blister Kit
- Repair Kit
- Inflatable sleeping pad patch kit
- Duct tape (can be wrapped around a trekking pole or a water bottle. Gorilla Tape tends to be the best brand for the mountains).
- Zip ties
- 6-10ft of 3mm accessory cord
- Bring two or three large ones. They serve a variety of uses. Trash compactor bag, if available, are more durable.
- Multitool/Knife
- Any multi tool similar to a Leatherman is great. One can be shared amongst tent-mates. Smaller and simpler is better than overly complex.
Optional Items
These items are not required, although many are nice “luxury” items that can make your expedition more enjoyable. Remember that a few ounces here and there add up to extra pounds on your back and knees during your expedition.
- Journal and Writing Device
- Some climbers like to keep a journal or log for writing on the trip. Ballpoint pens and pencils work well in the cold and at altitude but other ink type pens do not. “Rite-in-the-Rain” notebooks are more durable and more functional for the mountain environment than regular notebook paper.
- Some climbers like to keep a journal or log for writing on the trip. Ballpoint pens and pencils work well in the cold and at altitude but other ink type pens do not. “Rite-in-the-Rain” notebooks are more durable and more functional for the mountain environment than regular notebook paper.
- Altimeter Watch
- If you have one then bring it. It is a great tool to have in the backcountry, especially for navigation.
- Entertainment
- Books, games, cards, music player, kindle, etc. For evenings or other downtime.
- Portable Charging Device
- Phone charger, battery pack, or small solar panel. Highly recommended here if you anticipate using a lot of electronics during the duration of the expedition. Yes the Guides will have a solar panel and battery banks that clients can use as well, but expedition safety equipment is going to take precedent here. That and with many other clients on the expedition, time to be able to charge your personal device will be limited. Where if you bring your own you can charge whenever you want. If you do end up bringing something like this, please make sure you are familiar with everything and how it all works, this is not something you want to be figuring out on the mountain.
- NOTE: Solar panels should only be used to charge battery packs. Battery packs should be used to charge devices. Inappropriate use of a solar panel could lead to the depletion of a device’s power.
- Ear Plugs
- For defense against snoring and high winds.
- Sleeping Mask
- It is going to be light out for the majority of your expedition, even when it is ‘supposed to be’ dark out. The nature of being so far north and the tilt of the earth. This piece can be extremely valuable to have. Yes you can use other items potentially to cover the eyes when you try to go to sleep, question is are they going to be as effective. Again, any advantage you can get towards sleeping well is going to be very well worth it.
- Insect Repellant
- Recommended for use in Talkneetna and Anchorage. If bringing repellent look for more concentrated repellent in smaller containers. Pack it in a Ziploc bag to prevent contaminating other items in your pack.
- Comfortable Clothing and Footwear
- Plan ahead and pack some clean clothes (and flip flops!) in your duffel at the airstrip to change into when you get off the glacier.