











Climbs on large and complex glaciers always entail a risk of crevasse falls. Unlike a fall in rock climbing, where in many cases the fallen climber can simply be lowered to safety, a crevasse fall usually requires the rescuer to work against gravity. And the wet, cold environment in a crevasse imposes the risk of hypothermia, meaning that a rescue needs to happen quickly, even if the climber is uninjured. Crevasse rescue is a mandatory skill for mountaineers, followers and leaders alike, even on the easiest of glaciated routes.
The following crevasse rescue description is based on the coursework provided in the field during AAI expeditions and trips. This systematic description will make the most sense to those students who have already completed field instruction in crevasse rescue. These instructions will be an important review document for you to have after the course ends. However, you may find it helpful to print a copy to bring to the course.
This 2-person crevasse rescue description is broken into 3 parts. The parts are called Anchor, Z-Pulley, and C on Z. Most students obtain the best results when they think of this as a dynamic 3-part system. Students have problems and get lost when they lose sight of the objective. The individual steps enumerated here are merely one means to an end.
AAI Standard Crevasse Rescue Training Scenario
The scenario detailed below is used by most AAI Instructors to teach crevasse rescue in our 3-, 6-, and 12-day introductory mountaineering courses.
Limitations of This Scenario
- This scenario is too “scripted” to use as-is in more than a small fraction of real-life crevasse fall situations.
- The scenario is intended to be used as a supplement to in-person instruction by an AAI guide. There are too many nuances to capture in a written document, and it takes direct instruction and practice to become skilled.
Crevasse fall emergencies normally require some amount of improvisation on the part of rescuers. The tools that enable you to respond effectively in a crevasse fall emergency.
Prerequisite Skills
In all AAI instructional courses, we teach several important prerequisite skills before progressing to crevasse rescue. Some of these skills are discussed in blog articles listed below. Study the articles to help lay the groundwork for crevasse rescue instruction in the field.
Scenario Assumptions
This scenario assumes that the climbers are in a party of two, roped together and using mountaineers’ coils (not Kiwi coils) to shorten the rope. They are clipped into the rope either with the butterfly knot or the figure eight on a bight, using two locking carabiners on the harness belay loop/tie-in point.
In addition, the climbers in this scenario are using a standard Texas kick prusik system, as taught by most AAI Instructors/Guides. Both climbers have two prusik slings already hitched to the rope connecting them, a long “foot prusik” with two slip-knotted stirrups and a short “waist prusik”, the latter clipped back to the climbers’ tie-in points.
The scenario begins when the mock victim slides off the edge of a simulated crevasse – perhaps a wind lip or steep snowdrift. If you are using a real crevasse, back up the climbers with a belay.
arrest the fall and build an anchor
- Self-arrest and place your foot over the rope. Be sure to kick your feet in firmly to hold the weight.
- Place a piece of snow or ice protection and attach it to a locking carabiner. This locking carabiner will thus be designated the master carabiner. This first piece of snow protection must be extremely good. If it is not, both the victim and the rescuer will be in serious danger.
- Attach your foot prusiks to the master carabiner. Lock the carabiner and NEVER OPEN THE MASTER CARABINER AGAIN!
- Keeping your ice axe handy, slowly allow the victim’s body to weigh the anchor. Be sure to keep your ice axe within reach until the anchor is complete. If that first piece of protection blows out, you will need to arrest again.
- Take the rescue coils off your shoulder and slowly unwrap them. Be sure not to panic as the mountaineer’s coil is easily tangled.
- Estimate the distance up to the master carabiner, then estimate the distance from the carabiner to the crevasse. Add these 2 lengths together and then tie a figure-eight knot in the rope at this length. If there is a significant crevasse danger in the area, you may have to tie this knot closer to yourself in order to stay safe.
- Clear 1 of the 2 locking carabiners that you are tied into the rope with of all items. Clip the new figure-eight
- knot into this carabiner. Clear the second carabiner of everything. Leave your waist prusik on the rope.
- Work your way up to the master carabiner. Tie a figure-eight knot into the rope that is being held by your foot prusik. Using a locking carabiner, clip this into the master carabiner and lock it. This will back up the prusik that is currently holding the victim’s weight.
- Now, the first piece of protection will be backed up. It is important not to disturb the first piece while placing the second piece or all will be lost. Measure the distance from the master carabiner to your second placement. Be sure that when you place the second piece, you consider the length of the sling or cordelette with the carabiners on it. The second piece should be equalized as well as possible. Beginner-level students will stretch a sling tightly from the master carabiner to the second piece. Advanced-level students may use the clock and tackle with a cordelette. Once this is completed, the anchor will be finished.
- Take your pack-prusik or a shoulder-length sling and girth-hitch it to your waist prusik. The waist prusik should still be in the tensioned rope. If you are wearing crampons, be very careful not to step on the rope. Clip this extension to the unused locking carabiner at the tie-in point on your harness.
- Work your way towards the crevasse while probing for additional crevasses with your ice axe. You may have to re-tie your safety knot to reach the crevasse. Re-tie this knot whenever it is necessary.
- Once you reach the lip, confirm that your partner is conscious and needs to be pulled out of the crevasse. If he or she does not answer, you will have to rappel down into the crevasse to see what is wrong. To climb back out of the crevasse, it is possible to use your partner’s prusik cords. Pad and clear the lip before rappelling.
- If your partner answers and says that he or she needs to be pulled out, clear the lip of all snow. Warn your partner before you start to kick snow down on top of them. The entire rope should be visible at the lip of the crevasse before you are finished.
- Slide your ice axe under the rope at the lip to pad it. Place the pick in the snow to secure it. Clip the adze to the rope so that it does not fall into the crevasse.
- Unclip the extension attached to your harness. Take the pack prusik off your waist prusik. You should still be relatively close to the lip of the crevasse when this takes place.
- Clip a pulley to the waist prusik. Run the rope coming from the master carabiner through this pulley. The waist prusik may also be referred to as the “tractor.”
- Walk back up to the master carabiner. Clip a second pulley into the master carabiner and run the rope that is clipped to the locking carabiner on the master carabiner through the pulley. It doesn’t matter which side of the knot you attach the pulley.
- Untie the knot next to the pulley, but leave the locking carabiner attached to the master carabiner.
- Pull on the line that you are tied to. Haul the victim up approximately a foot.
- Untie the knot between the pulley attached to the master carabiner and the foot prusik. The foot prusik may be referred to as the “rachet.”
- You may now haul the victim on a 3:1 system. Remember to mind the foot prusik (rachet) while hauling, and be aware that for every 3 feet you pull, the victim will only rise 1 foot. You have now completed the Z-Pulley.
Setting up a C-on-Z Pulley
- To add the C, I must tie the end of the rope into the anchor!” Many guides force their students to chant this for a reason. If you can remember this element, the rest of the rescue will make more sense. Tie a figure-eight knot into the end of the rope and clip it into a locking carabiner on the master carabiner. If everything has gone as planned, there should still be a spare locking carabiner on the master carabiner to use for this purpose.
- Tie a knot next to the pulley nearest the crevasse lip and clip a carabiner into it. This knot may be a clove-hitch or a figure-eight. Advanced students may place the pack prusik on the haul line here with a non-locker clipped to it. An additional pulley may also be added to this carabiner.
- Clip the line that you just clipped into the locking carabiner into the new carabiner down by the pulley nearest the lip. This is your new haul line.
- You now have a 6:1 hauling system. You have completed the C-on-Z pulley system. It is important to realize that you must haul 6 feet for every foot that the victim rises.
The photo below shows a completed anchor. The red carabiner is the master carabiner. Note that there are 2 pieces of gear. The first piece placed was a snowflake. The backup piece was a picket buried in a T-slot. The blue carabiner is the backup line.
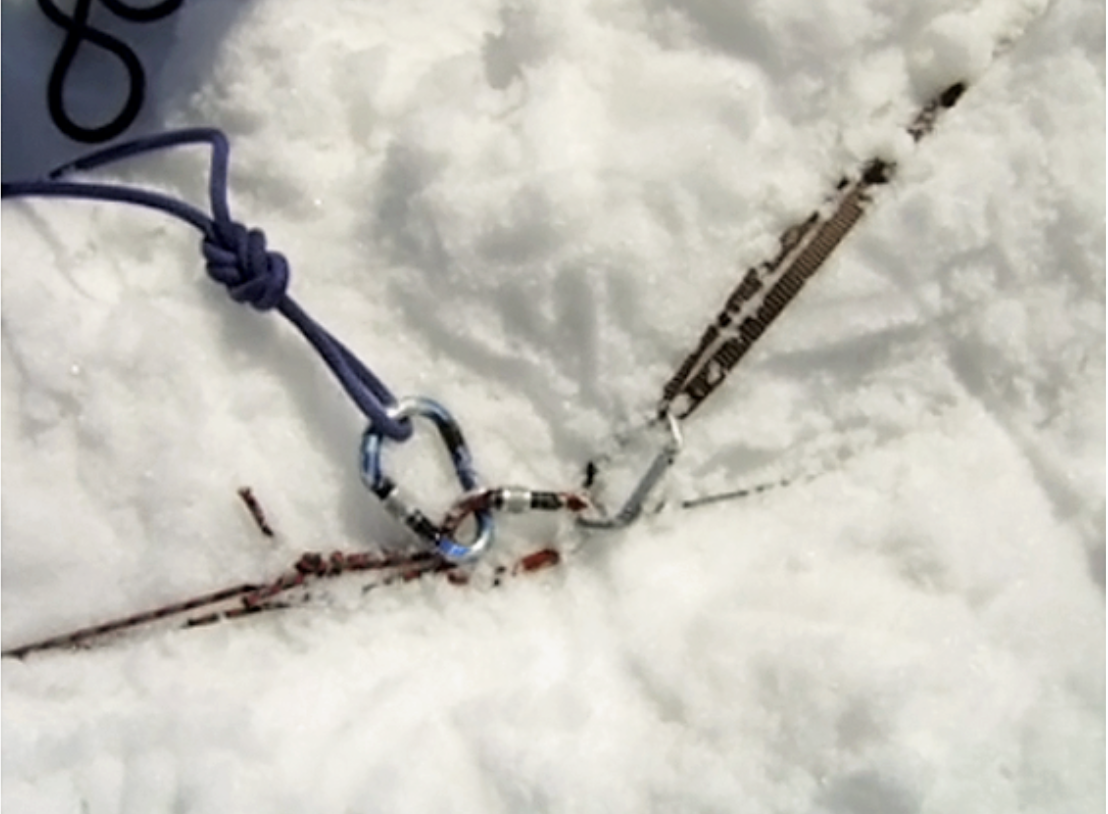
This photo shows a completed Z-pulley anchor. There will be 1 more step for the rescuer in this picture. They will have to release the figure-eight knot from the blue locking carabiner before the rescue can continue. The blue locking carabiner should stay in place for later use.
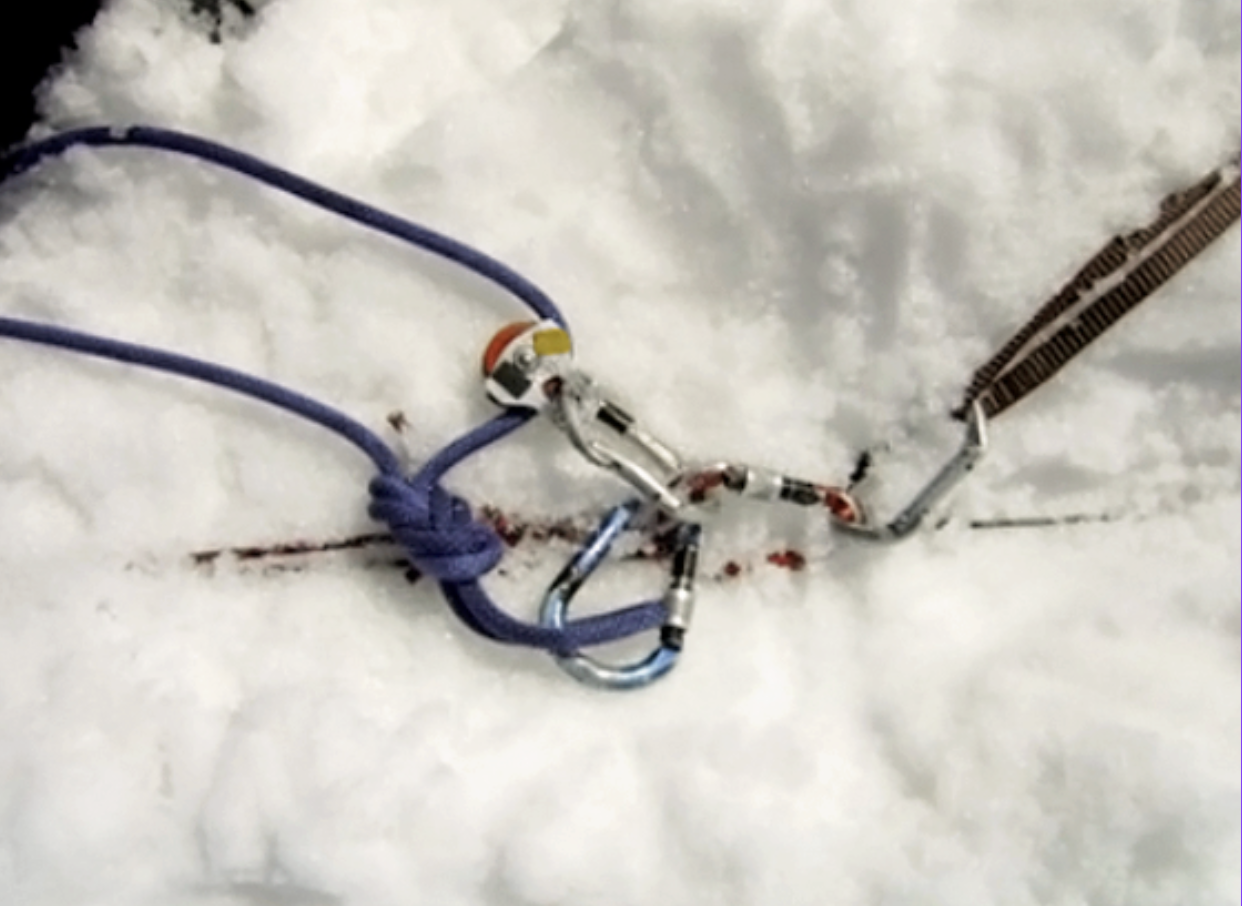
The following photo shows a completed Z-pulley system. The rescuer needs only to pull on the “haul line” in order to get his partner out of the crevasse.
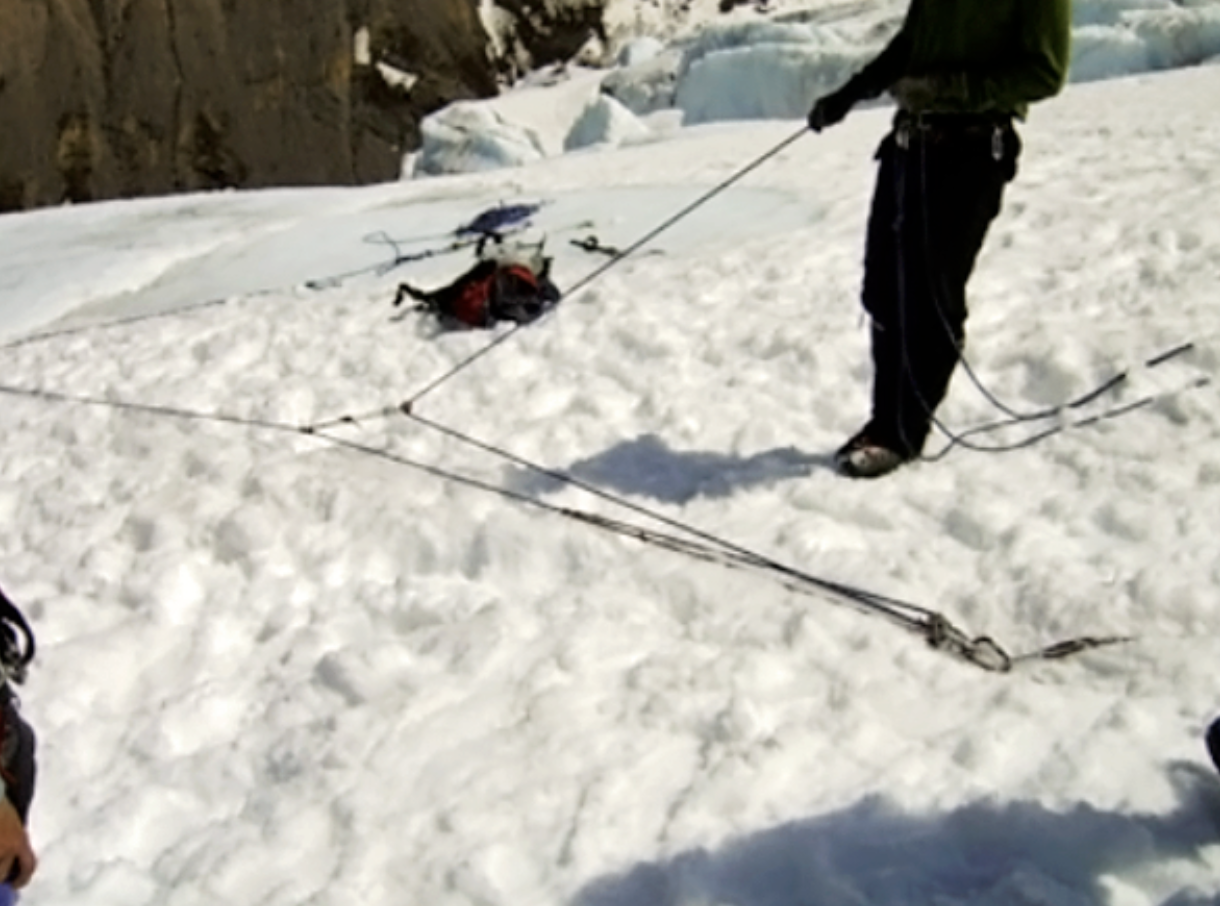
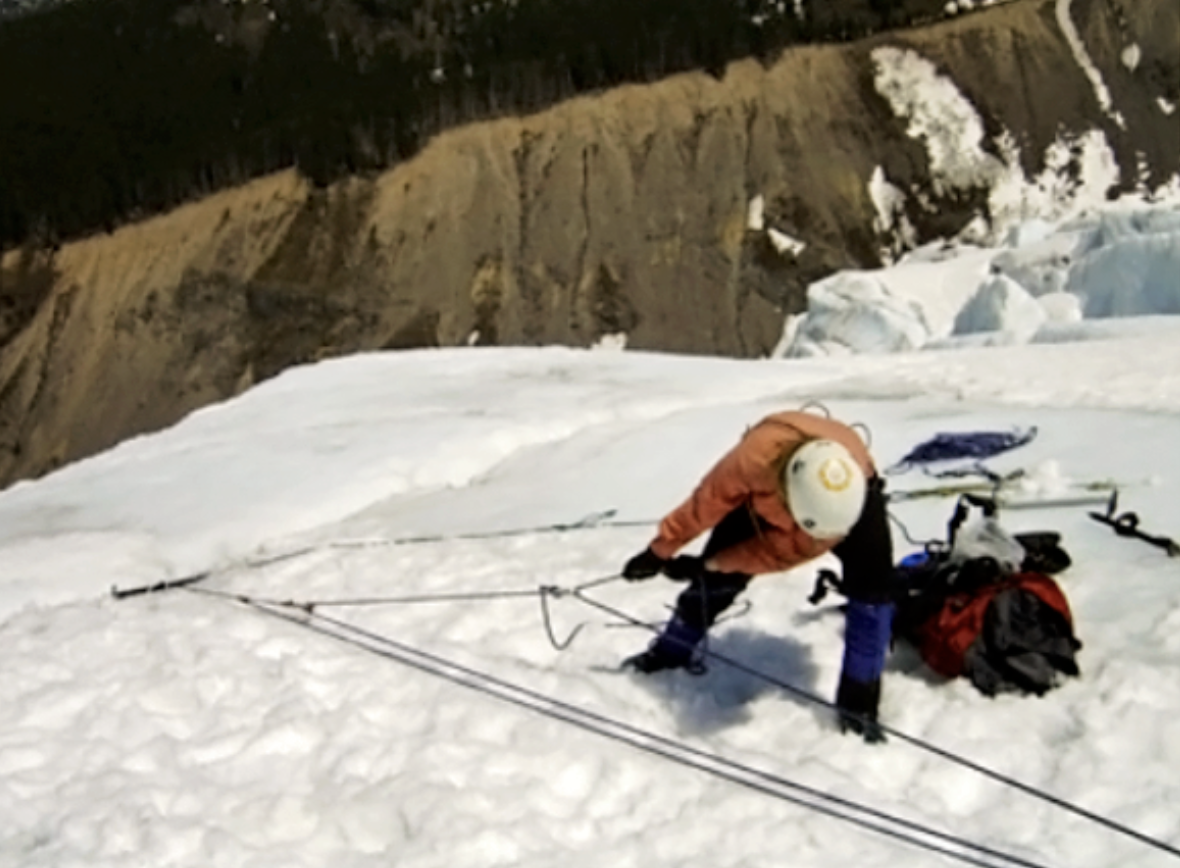
This photo shows a climber hauling his or her partner out of a crevasse with a completed 6:1 pulley system. We often refer to this as a C-on-Z pulley system.
Other Things to Consider
- Always pull away from the crevasse.
- If the victim suddenly becomes more difficult to haul, check the victim. Do not crush the victim in the lip of the crevasse.
- Make sure the victim keeps their hands away from the rope as it cuts through the lip.
- Lock all carabiners. You only need 2 locking carabiners aside from the 2 on your harness to complete this rescue.
- If you can haul the person out on a 3:1, then do it. It will be faster.
- Once you understand the system, experiment with shortcuts. Do not experiment until you have a concrete understanding of the whole system.